Create a credit memo
To create a credit memo:
- Select Transactions > Credit Memos.
-
Select Form > New > Credit Memo to open a new credit memo batch.
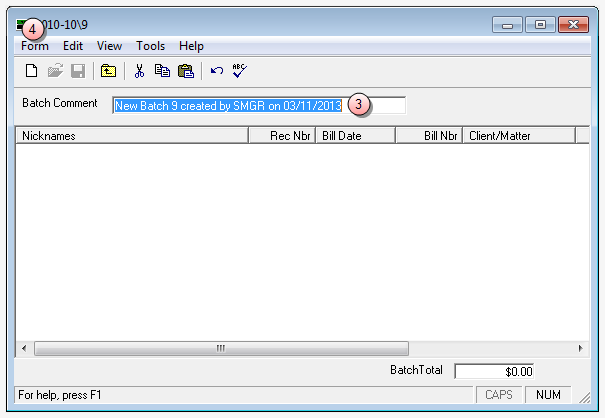
- In the Batch Comment box, type a comment relative to this batch, or accept the default.
-
Select Form > New to open the new credit memo window.
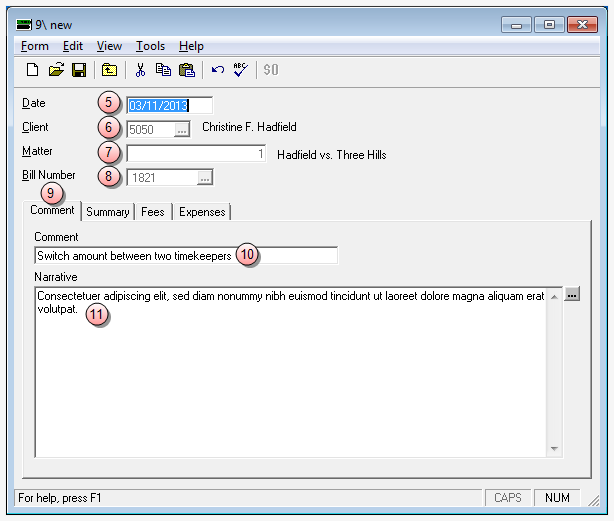
- In the Date box, type a comment date or accept the default date.
- In the Client box, type the client code, or click the ellipses button to search and select the client and matter from the finder window.
- In the Matter box, type the matter code, or click the ellipses button search and select the client and matter form the finder window.
- Click the Bill Number ellipses button and select the bill you are applying a credit against.
- Click the Comment tab if not already displayed, to select it.
- In the Comment box, type a short reason or purpose for the credit memo. (Required)
-
In the Narrative box, type a explanation relative to the credit memo, or click the ellipses button to select a template or pre-formatted narrative. (Required)
The adjustment amount may be entered on the Summary tab, Fees tab, or Expenses tab as appropriate.
Note
Enter a negative amount to reduce the amount of the bill or enter a positive amount to increase the amount of the bill. Use the Write Off Balance option, if desired.
Tip
The Summary , Fees, and Expenses tabs let you apply an adjustment in a particular manner. For example, if a $500.00 adjustment is applied to fees on the Summary tab, the system allocates that amount to all timekeepers on the bill. If you elect to go to the Fees tab, you can apply that $500.00 adjustment to a particular timekeeper, if desired. Both positive and negative adjustments can be made. For example, a negative adjustment can be made on one timekeeper and a positive adjustment in the same amount made to another timekeeper, in order to move the A/R from one timekeeper to another.
-
Click the appropriate tab(s) and make your allocations.
 Use the Summary tab to apply an allocation in equal parts across all timekeepers.
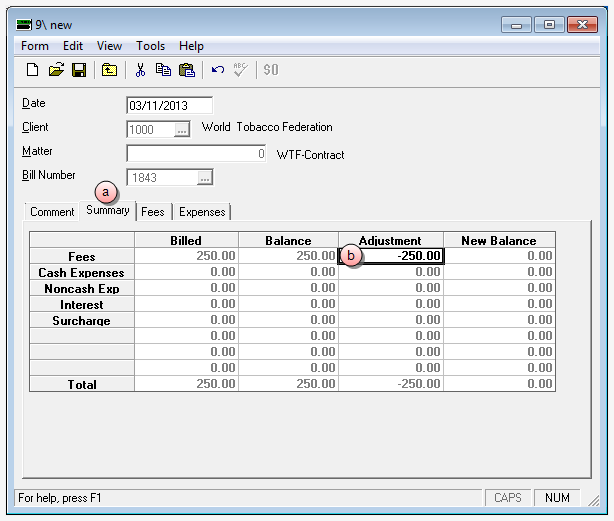
- Click the Summary tab.
- In the Adjustments column, type the amount as a negative number to decrease the bill (or a positive number to increase the bill - this is less common.) Usually a credit memo is created when you want to decrease a bill amount.
 Use the Fees tab to apply an allocation in varying amounts, across multiple timekeepers, or to move an amount from one timekeeper to another.
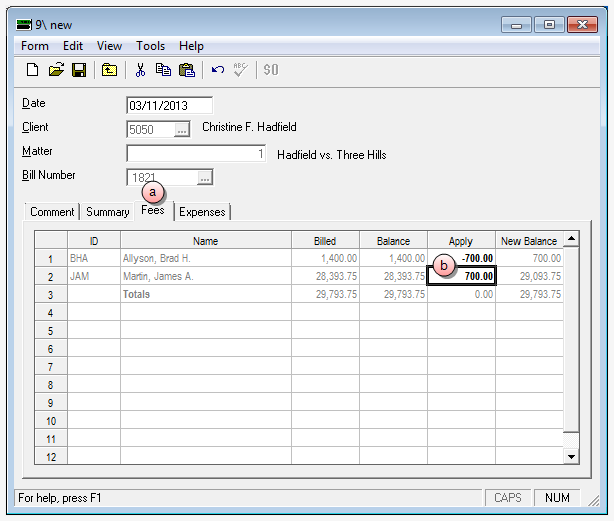
- Click the Fees tab.
- In the Apply column, type the same amount(s) that were entered on the original credit memo for all applicable fees.
 Use the Expenses tab to apply a credit memo to one or more billed expenses, and/or in varying amounts.
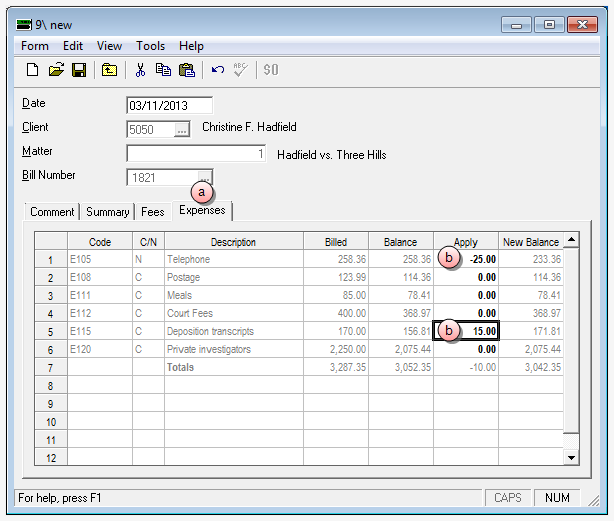
- Click the Expenses tab.
- In the Apply column, type the amount for each expense item you are adjusting.
Important!
If you click Save, the program automatically posts the credit memo. Therefore, it is recommended that you verify the information you have entered, prior to clicking Save.
- Verify the accuracy of the information you have entered.
- Select Form > Save to save the credit memo.
-
Click the window Close button, to close the Credit Memo window.
Posting of Credit Memos is automatic upon saving, so there are no manual posting steps involved.